Explorer Kit for Robotics and DIY Prototyping Compatible with Arduino IDE
₹3,450.00₹4,500.00 (Price is Exclusive of GST) (-23%)
- Robotics Kit Arduino based Do it Yourself Type Kit
- Explorer Board- UNO compatible microcontroller board with integrated motor controllers, RGB LED, and breadboard
- Power Supply Module- To be used with 18650 Li-Ion batteries with on-board charge and usage switches
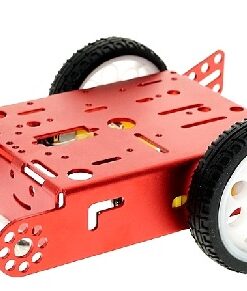
- Acrylic Chassis- Consists of two layers for mounting the electronics and serves as the chassis of the robot. Also contains 4 nylon spacers for connecting the top and bottom layers.
- Micro Metal gear motors- Two motors used for robot mobility. Wheels & Tyres- Plastic wheels with silicone tyres for great traction.
- Line Following Array- Line following sensor consisting of 5 individual sensors to help in projects such as line following. Ultrasonic Sensor- Adds distance sensing capability to your project.
Description
Robotics Kit Arduino DIY
The Explorer Robotics Kit Arduino is a versatile Do it yourself platform to help you understand the fundamentals of robotics & electronics. The kit aims to solve the most commonly faced problems while dealing with microcontrollers and allows you to focus on the important parts of your project.
Using the components in this kit, you will be able to make various beginner as well as advance level projects . The Explorer Board is a custom Arduino compatible microcontroller board. The onboard microcontroller is the ATMega328P which is the same as the one found on commonly used Arduino Boards. The board has integrated motor drivers to help power two motors independently. Motors can be connected using the two screw terminals. It also has an on-board RGB LED which can be controlled via programming. Both the motors as well as the RGB LED can be disabled using the on-board DIP switch
The Robotics Kit arduino board can be powered up using the power supply module provided along with the kit by connecting the cable in the Power IN terminal
Application
- Line follower, Obstacle Avoider, Line Maze Solver, Light Bug, etc.
- Can be used in other Prototyping also
- Can be used in Precision robotics
Package Includes
- Explorer Board-UNO ATmega 328P compatible microcontroller board
- Power Supply Module- To be used with 18650 Li-Ion batteries with on-board charge and usage switches.
- Acrylic Chassis- Consists of two layers for mounting the electronics
- Micro Metal gear motors- Two high quality motors used for robot mobility.
- Line Following Array- Line following sensor consisting of 5 individual sensors
- Wheels & Tyres- Plastic wheels with silicone tyres for great traction.
- Ultrasonic Sensor- Adds distance sensing capability to your project.
- Electronics learning starter pack- LEDs, Resistors, Buzzer, LDR, Pushbutton, Wires
Wire Configuration
- The Explorer Board is a custom Arduino compatible microcontroller board. The onboard microcontroller is the ATMega328P which is the same as the one found on commonly used Arduino Boards.
- The board has integrated motor drivers to help power two motors independently. Motors can be connected using the two screw terminals.
- It also has an on-board RGB LED which can be controlled via programming. Both the motors as well as the RGB LED can be disabled using the on-board DIP switch
- The board can be powered up using the power supply module provided along with the kit by connecting the cable in the Power IN terminal.
Programming the Explorer Robotics Kit arduino Board
In order to program the board, you will need the USB cable provided in the kit.
Once you have written a sketch in your Arduino IDE follow these steps to ensure the code gets uploaded correctly.
- Connect the Explorer Board to your computer using the USB cable provided in the kit
- Go to Tools>Board>Select Arduino Nano
- Go to Tools>Processor>Select ATMega328P
- Go to Tools>Port>Make a note of the available ports in the list
- Unplug the USB cable from your computer
- Repeat step 4- and note which port is not showing up in available port list. This is the port that you will use to program the board
- Now reconnect the USB Cable and select the right port
- Click on the Upload button to upload your sketch
Explorer Board Pinout
The most commonly used pins can be categorized into the following categories-
- Digital I/O- used along with the digitalWrite and digitalRead commands. Among these pins 3, 5, 6, 9, 10, 11 are PWM pins to be used with the analogWrite command.
- Analog Input- used while reading data using the analogRead command
- Power I/O-
- VIN- used to power up the board using an external power source.
- 3.3V- used to output a regulated 3.3V supply
- 5V- used to output a regulated 5V supply
- GND- Used to connect ground pins
In addition the board also consists of RX/ TX Pins used for Serial communication and the RST pin used to reset the board using a LOW signal.
Specification
Additional information
| Weight | 500 g |
|---|---|
| Dimensions | 20 × 20 × 20 cm |
| Microcontroller | ATMEGA328P |
| POWER SUPPLY | 9V LION |
| Programming Software | Arduino IDE |
| Motor | N20 |


Reviews
There are no reviews yet.